My first stretch bake for Dib Bakes. The labor needed to produce these perfect danishes is absolutely offset by how delicious they taste. You’ll want to give yourself time for 2 days, the first to make and fold the dough, and the second you shape, fill, and bake the pastry. The cardamom addition to the dough makes every step of the process an aromatic and joyful experience!
Recipe
Time: 2 hours, plus resting time
Yield: at least 36 danishes
Ingredients
Dough
- 32 tablespoons (454g or 1 pound) unsalted butter, at cool room temperature, 65°F to 68°F
- 5 1/2 cups (660g) Unbleached All-Purpose Flour
- 1/3 cup (67g) granulated sugar
- 4 teaspoons instant yeast
- 1 1/2 teaspoons (9g) table salt
- 1 teaspoon cardamom
- 1 teaspoon Pure Vanilla Extract
- 1 cup (227g) milk, cold
- 1/3 to 1/2 cup (76g to 113g) water, lukewarm
- 2 large eggs
Cheese filling
- half an 8-ounce package (113g) cream cheese
- 1/2 cup (113g) cottage cheese or ricotta cheese
- 3 tablespoons (35g) granulated sugar
- 1 large egg
- 1/4 teaspoon table salt
Fruit filling
- about 1 to 1 1/4 cups (298g to 369g) jam, preserves, or canned fruit pie filling
Topping
- 1 large egg white, beaten lightly with 1 tablespoon cold water
Glaze
- 1 1/2 cups (170g) confectioners’ sugar
- 2 to 2 1/2 tablespoons (28g to 35g) milk, enough to make a “drizzle-able” glaze
- pinch of table salt
Instructions
Day 1
- Begin by cutting 1/4″ butter off the end of each of the 4 sticks in the pound; you’ll have about 2 tablespoons butter. Set them (and the remaining butter) aside. You’ll be using the 2 tablespoons butter immediately, but won’t need the remaining butter until after you’ve made the dough.
- In a large bowl, whisk together the flour, sugar, yeast, salt, and cardamom. Add the 2 tablespoons cold butter, working it in with your fingers until no large lumps remain. This step coats the flour a bit with fat, making the pastry a tiny bit more tender.
- Add the vanilla, milk, water, and eggs. Mix and knead to make a cohesive, but quite sticky dough.
- Scrape the dough into a ball, and transfer it to a floured work surface. Cover it with plastic wrap, and let it rest for 10 minutes while you prepare the butter.
- Cut butter as necessary to create even rectangles. On a piece of floured parchment or plastic wrap, line up half of the butter pieces side by side, to form a rectangle. Sprinkle lightly with flour, and cover with another piece of parchment or plastic wrap.
Gently pound and roll the butter until it’s about 6″ x 9″. The pieces may or may not meld together. - Repeat with the remaining pieces of butter. You should now have two butter rectangles, about 6″ x 9″ each.
Roll the dough into a rectangle about 12″ wide and 24″ long. - Place one of the butter pieces onto the center third of the dough. Fold one side over the butter to cover it. Place the other butter piece atop the folded-over dough, and fold the remaining dough up over it. You now have a rectangular “packet” of dough-enclosed butter. Pinch the open ends and side closed as best you can.
- Turn the dough 90°, so a 12″ side is closest to you. Roll the dough into a 10″ x 24″ rectangle (approximately).
- Fold each side into the center; then fold one side over the other to make a rectangular packet about 6″ x 10″.
- Dust the surface of the dough with flour, wrap it in plastic wrap, and chill in the refrigerator for about 20 minutes.
- Remove the dough from the fridge, and again roll it into a rectangle about 10″ x 24″. Fold it into a packet as you did in step #10; it’ll be about 7″ x 12″.
- Roll one final time, fold into a packet, and flour the dough lightly. Wrap loosely (but completely) in plastic, and chill it for at least 2 hours, or up to 16 hours.
Day 2
- When you’re ready to make pastries, remove the dough from the refrigerator, unwrap it, and cut off one-third. You’ll work with this piece first; return the remainder to the fridge.
- Roll the dough into a 8in x 16in square and then divide into eight 4in squares. Scraps can and should be used to make additional danishes.
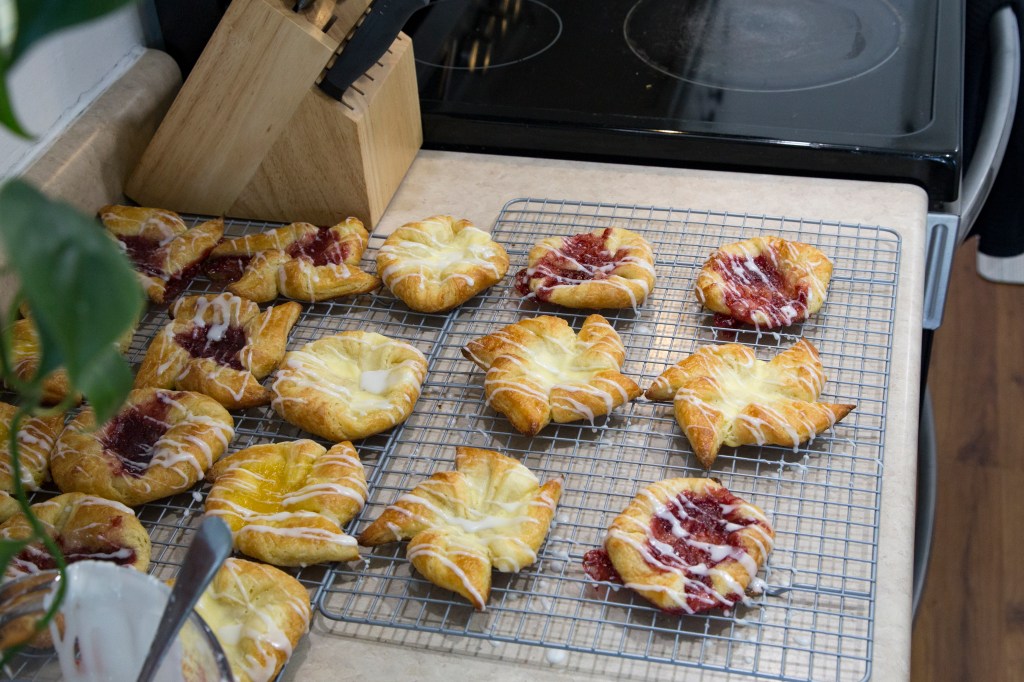
- The danishes can be shaped into a variety of classic shapes (see video for shaping).
- Place the rounds on a parchment-lined baking sheet.
- Working with one-half of the remaining dough at a time, repeat the process; you’ll finish with three baking sheets, each with 12 shapes and scraps!
- Cover the Danish lightly with plastic wrap, and let them rise for about 1 hour; they’ll become slightly puffy.
- Towards the end of the rising time, preheat the oven to 400°F
- While the danishes rise, prepare your filling(s).
- To make the cheese filling, combine all of the ingredients, stirring until smooth. For the smoothest filling, process in a food processor. This recipe makes enough filling for all the danishes.
- Once the danishes have risen, use your fingers to press the centers of the dough shapes as flat as possible, leaving the “sidewalls” puffed.
- Spoon a slightly heaping measuring teaspoon of filling into the well of each round.
- Brush the exposed edges of pastry with the egg/water topping; this will create a satiny, golden crust.
- Bake the pastries for 15 to 18 minutes, until they’re golden brown. Remove them from the oven, and transfer to a rack.
- To make the glaze, whisk the confectioners’ sugar and salt with enough water or milk to make a “drizzle-able” glaze.
- Once slightly cooled, drizzle glaze atop the danishes.
- Store in an airtight container.
Tips and Tricks
This recipe is from King Arthur Baking Company. I followed the steps verbatim from the online version, but created the shapes from the danish recipe found in their cookbook. I used the cheese filing recipe provided as well as a passion fruit curd I made earlier in the week and a store-bought raspberry jam that I love.
High quality is the best quality, especially when it comes to pastries. Find the nicest butter you can for these and you’ll be rewarded. European butter is often requested, but find whichever butter has the lowest amount of water. I used salted butter for this recipe.
I’m a perfectionist and found following the measurements to be essential in shaping neat danishes. I used all the scraps to make not-as-neat-but-just-as-delicious danishes. My mom’s not a big fan of filled things so I left some danishes un-filled, but still glazed them – delicious.
The jam may soften up the following day after baking. It still tastes amazing, but may be messier to eat. Store accordingly.

Leave a comment